Moonwishes Sewing and Crafts

Moonwishes Sewing and Crafts
Visit Our Store!

Wednesday, January 23, 2013

Practicing Circular Stitching

My hubby got me a circular stitcher accessory for my Janome 7700 for Christmas. I had been wanting one since this machine has all sorts of decorative stitches. I had a bit of a difficult time installing it on my machine but that could have very well been weakness in my hands form the arthritis. I had found on the Bernina website a project for learning to use their circular stitcher. I don't care where I find ideas, if my machine can do them, I will try them out. So I printed out the instructions and photo of the project and went to town. What fun! You can do some amazing things with a circular stitcher, but it pays to practice. You have to learn not only how to set up the design, you have to learn which designs work well in circles and how to hold the fabric. Here is part of the sample that I made.

I decided that the smaller circle would look good with a button and since I had just found a little bag of buttons at my thrift store and one was the perfect color, I used it. I have had machines that have had the capability to sew on a button with the included button foot for at least 20+ years and have never sewed a button on with the machine before. I think I was always sure I would break a needle or in some way damage something. Instead I have either avoided buttons altogether or sewed them on by hand, making a mess of knots in the back. I do quite nice embroidery but buttons baffle me. With some directions from The Sewing Machine Accessory Bible, which is a great book on presser feet by the way, I attached that button foot and did a little adjusting and in no time I had sewn on a button. No snarls , knots or tangles on the back either. The only problem that I had was getting the button exactly where I wanted it. It was supposed to be in the center of the circle yet it is off center.

The circle that the button is in is fringe I made with the circular attachment by sewing a close zigzag at 7mm and then sewing on the far left of the satin stitch with a straight stitch. I did get a little wobbly, so yet another thing to practice. After sewing the satin stitch and then the stitch to hold them down, go to the back of the fabric and snip the bobbin thread and if you did it right, you end up with fringe which would make a great flower.


Monday, January 14, 2013

My Sewing ME Year

Most years lately I have been finding myself working on large sewing projects, that haven't left me much time for doing any sewing for me, practicing new techniques or improving my skills. Before 2013 even got here, I decided that this would be my ME year. I want to work on bettering my skills, learning new things, and making projects that strike my fancy and also clean up the clutter in my sewing room.

To begin this quest, I signed up for several Craftsy classes. I signed up for their 2012 and 2013 Block of the Month classes and also Stupdendous Stitching. I spent some time on a Bernina website and found some interesting projects using a circular stitcher that I had gotten for Christmas. Well I have already finished my BOM blocks for both classes for the month of January and am working on a circular stitcher project. The only thing left is to start in on the Stitching class. I have over 200 decorative stitches on my sewing machine and I want to learn how to use them effectively.


My last several quilts, although I worked hard to make everything come out right, my blocks ended up the wrong size. When I started the 2013 BOM block, I did my usual thing and found the blocks were quickly getting to be the wrong size besides I was working with fabrics I didn't really like. So, I took careful measurements and shifted my needles position and set my needle at a 4.6 width instead of the 3.5 and put the cloth guide that came with my machine in place. I also picked some fabric that I liked better and was very happy to make 4 -  6 1/2" blocks that were the right size. Too bad I hadn't done this years ago, all my quilts would have turned out better. But, this is the reason that I need this year to slow down and take my time getting things right.

Wednesday, December 26, 2012

Latest Quilt


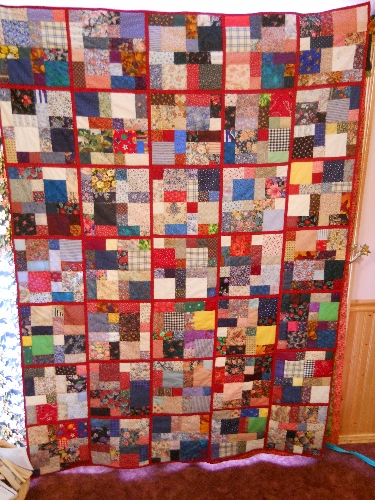
Now that Christmas has been here and the presents are opened, I can now share my latest quilt project that I made for my son Steve. Steve is 6'2" I believe, so the quilt had to be pretty large to fit over him. I made it approximately 7' x 5'. I used plenty of scraps in it that were already pre-cut in the 4 and 2" squares and the 4x2" rectangles that I have mentioned before. See what a help that can be to have those cut out ahead of time? Some of the scraps in this quilt are from Ron and Savannah's wedding tablecloths that I snitched with permission, and also scraps from just about every special person I have made a quilt for including an old boyfriend that remains a friend to this day. Steve may not know all the memories, but they are there. I put this quilt together in a quilt as you go technique that I keep trying to improve on (at least my technique) so that it doesn't kill me with my arthritis to make a large quilt, but at this point, I think I am going to cry 'uncle'. Even with doing the quilt in sections, when I finally put the last two together (which was the whole bulk of the quilt) the muscles in my neck, shoulders and hands were cramping up like crazy. One thing I did do that was a huge help was binding the long edges and mitering the corners before putting all the sections together so I wasn't having to manipulate all that fabric and batting. It was just quick work to finish the binding on the top and bottom when I put all the sections together. I even MITERED the corners! A first for me thanks to a Nancy Zieman video that I watched enough times that dyslexic me could figure out which way to bend the binding strips.


I reference Sharon Pedersons' Reversible Quilts books each time I do a quilt as you go quilt and they are a big help. Until just a few minutes ago I didn't realize that she had a DVD out, but I bet it would be a really big help. The back of each of the blocks in Steve's quilt is a different fabric so he can use it either direction. It is such a bright quilt, I called it Steve's Happy Quilt, becuase how can you wake up sad after sleeping under it? this quilt was made entirely on my Janome 7700 Horizon sewing machine.


Couture Techniques for a Better Fitting Waistband - Threads

Couture Techniques for a Better Fitting Waistband - Threads  Check out this interesting article from Threads magazine!

Wednesday, December 19, 2012

Make a Snowflake for the Students of Sandy Hook

Make a Snowflake for the Students of Sandy Hook  Following the tragedy AT Sandy Hook School the PTA is wanting to decorate the school as a winter wonderland for when the students come back by decorating it with snowflakes. If you have access to an embroidery machine, Embroidery Library is giving away a free lace snowflake design in three sizes that you can make. They would like to have all the snowflakes arrive at there office by January 12, 2013. Please visit the link to Embroidery Library for full instructions and the download to the snowflakes. If you can't machine embroider, I'm sure that they are taking any sort of pretty snowflake. Let's all do what we can to help these children return to some sort of normalcy in their lives and show the parents we care!

Saturday, December 08, 2012

Embroidered Pillowcases


Year's ago I was given a big box of Work Basket Magazines. I didn't really want to keep all of them, but before disposing of them, I did go through them first and removed all the embroidery transfers that were in them. When I decided a few weeks ago that I wanted to embroider some pillowcases, I went through the transfers and found one that I liked and used them to put the design on the pillowcases. The nice thing about using these transfers is you don't have any concept of what colors to use or what stitches to use. You get to be as creative as you want. I pulled out my copy of The Embroiderer's Handbook which I have found to be the BEST embroidery stitch guide I have ever seen and started sewing. I used several stitches that I had never used before and also some variegated threads, especially for the birds. For the bird I used the Fishbone Stitch found on page 73 of the book. For the green leaves I used Lattice Couching found on page 99 (I do need a bit more practice with that stitch), I also used a long stitch with a French Knot on the end for the pistils of the flowers. I enjoyed my time sitting and stitching. I also found when stitching I tend to not much which has it's own benefits!


Tuesday, November 27, 2012

How to Miter the Inside Corner of a Hong Kong Finish - Threads

How to Miter the Inside Corner of a Hong Kong Finish - Threads

Another great idea from Kenneth King and Threads magazine. One reader commented that this would be a good way to bind an inside corner of a quilt, so most any inside corner binding would profit from this information.

Thursday, November 15, 2012

Pinterest

I had been hearing of Pinterest for awhile and a few weeks ago finally checked it out and joined. I love this site and most seamstresses and quilters would. It is pretty much photo based and when you see some photo of a gorgeous quilt or sewing project, you can 'pin' it to your board and be able to refer back to it later. You can also sort what you save by different boards, like recipes, sewing ideas, Christmas, your own projects, whatever you want and whatever you want to call them to help you remember what is in them. I have a board called Inspiration that has photos of all sorts of things from wedding cakes, architecture, fishes, sky scenes, etc. If something appeals to me whatever the reason such as colors being used together, shapes that might make a great quilt, and so on, I pin it onto my Inspiration board. For those of us without ready access to a camera (or the ability to take decent photos) this is a great substitute and wonderful way to keep track of ideas, kind of like a file folder full of pages torn out of magazines that inspire you.

Anyhow, if you aren't acquainted with the site, I thought I would mention it in case it would appeal you whatever type of sewing or craft work that you do. You have to be invited to join (don't ask me why) and I can send invites to anyone that would like one, and NO I do not get paid for bringing in new people. Some of you have fantastic quilts and sewing projects that the world should see and Pinterest is a great place to share them. I have found spending some time on Pinterest at the end of the day is a very calming thing and seeing all the DIY ideas gives me hope that our next generation really will be sewing and crafting and carrying on our work as sewists.

Saturday, November 10, 2012

New Quilting Books

I will admit being addicted to books and especially sewing and quilting books. I was feeling very well the other day, so on top of running some necessary errands which usually leave me wiped out, I ended up at Joann Fabrics in front of the quilt book display (40% off no less)! I couldn't resist and two books and one magazine got popped into my cart. While many of the books on the display would have been of interest to me, when I picked these books up, they were so compelling I just knew I had to read them and study them. Of course, bringing them home made me want to try things out, except the elves have taken over my sewing room until December 25th. Until those projects are done I CAN NOT start another one except in my mind!!! See I'm being firm with myself.

The first one was Easy Grid Quilts . I have been seeing it advertised in quilting magazines, but the title didn't really help me understand the book and even though the front cover showed a compelling quilt I wasn't sure what it was about. Wow! What a book, especially for someone like me. When I finish any quilt project, all scraps are cut into set sizes of pieces. Generally I cut them into 2 1/2" squares, 4 1/2" squares and a 2 1/2" x 4 1/2" rectangle, but I have plenty of other size pre-cut squares and pre-sewn pieces. In other words, I could probably make one of her quilts without cutting any fabric at this point. See why I have to hold myself off of starting any new project until Christmas is done? Her whole book shows that by following a particular grid with set sizes of blocks, with set colors or fabrics, and even including applique if you like; you can make a fantastic quilt. She actually shows several different type grids in the book. For those that have lots of pre-cut pieces that you want to try something new with this might be a good book for you to check out.

The other book I got was Thread Magic Garden: Create Enchanted Quilts with Thread Painting & Pattern-Free Appliqué.  While the author's quilts aren't technically the type of quilt that I would want to make, I did want to learn her techniques. When I opened the book in the store, I realized that I would really have to study the book. It wasn't just something that you can flip through and remember everything like some books. I'm not done studying it or reading it yet. However, this morning on the Quilting Arts TV show, Ellen Anne Eddy, was featured and she showed how she did what she talks about in her book so that really was helpful, besides she was a very funny lady. If you want to learn how to thread pain flowers, this book would be a good reference and instruction source for you.

Saturday, October 27, 2012

Recycled Pants = Skirt

Several months or possibly a year ago, Vogue Patterns magazine published an article on converting a pair of pants into a skirt, without the resulting 'hippy/boho' look that usually happens. I'd been wanting to try that as I usually wear skirts, so took a pair of green corduory pants that were a good 12 or more years old but were wearing like iron to try out the project. Found that the skirt ended up too short for my nasty looking knees, so added another strip of corduory from the leftover legs and a nice chunk of lace and my knees are covered. Instead of 'hippy' I got 'old fashioned' style! Oh well, not something most women my age would probably wear, but I'm happy to have something 'new' to wear. Now I have to decide if I want to do this with some of the many pairs of jeans I have that aren't getting worn.

Tuesday, October 23, 2012

New Addition to My Sewing Room

Since our last desktop computer bit the bullet, I haven't done any machine embroidery. For some reason, my Customizer program never got installed on the newest computer even though it was on my laptop. But the laptop wasn't connected to a computer and I now needed a doohickey so that I could use the memory card in my 300e. The worst thing about sewing and computer stuff is how easily they go out of date. Anyhow, I realized that part of my problem in getting behind in embroidery projects, other than just poor health and lack of time, is that I have always had my computer and printer right next to my machine so that sewing out a designs after printing a template was super easy. Well a few weeks ago when I got my list from Amazon on items that I could pick to review, there was a printer on the list! I managed to get it (usually things like that disappear before I ever get a chance to see it). So our newest member in our computing family is a Samsung color laser printer! It arrived and with no particular 'need' for a printer Hubby and I discussed where to put it for awhile. Since the toners for this printer are rather expensive and the paper tray doesn't hold much, we knew we couldn't use it for the routine office work for our business. So now my sewing room has a new, very special color printer. The printouts in color are terrific. Laser is so much better than ink jet! I got it set up and my laptop besides it with the Janome 300E off to the side of me and suddenly I felt at home again. I was able to print out in color templates for a Christmas gift I want to make. Now I can do what I need to without having to bother hubby while he is on the computer. I'm still trying to sort out and straighten up the sewing room and then it is back to the quilt I'm making for someone specials Christmas present and have another present embroidering out at the same time. What fun!

If you want to see what I got, click on the Amazon link below. I don't expect you to buy it, but if you need a great color printer, this is a nice one. I'm just happy to have a new 'toy'.

Thursday, October 11, 2012

How to Make a Snail Frog Closure - Threads

Here is a technique that you might want to try. Kenneth King is so creative and his instructions are easy to understand. How to Make a Snail Frog Closure - Threads

Thursday, October 04, 2012

Sewing Savvy

Yesterday, I had a chance to run into town and stop at the library for a bit. As I usually do when there, I check out all the magazines that have been donated and are up for sale. I managed to snag 8 copies of the 2008-2009 issues of Sewing Savvy magazine. I'm sorry to say that this publication has ceased publication at this point. I did a quick flip through and when I have time I will be reading more of the articles in the magazines. They have an impressive amount of projects for embellishing clothing, kids clothes, kitchen and home projects, aprons, and seasonal decorations. Rather than focus on one type of sewing, they would give tips on what to do if you, say for instance, don't have an embroidery machine how to make the featured item anyhow. They also used lots of fancy stitches when appropriate. I especially love books and magazines that can help me imagine the possibilities of all the decorative stitches on my machine. I know I am going to get lots of ideas from these magazines, and the best part? They were only 25 cents apiece which I managed to scrounge the $2 total price out of the coins in the bottom of my purse!

For those that have hobbies and want to thin out their stash of magazines, etc. don't forget your local library or thrift store -- never, ever the garbage. Most are happy to take donations. I know I personally am always ready and willing to take any kind of needlecraft magazines off of any one's hands. Free of course being the best price LOL! I use them as the equivalent of picture books on the days I'm especially not feeling well as it takes my mind off the pain. So many thanks to whoever donated these particular magazines to the McCord Library in North East, PA! I've gotten some great magazines there during this year.

Friday, September 21, 2012

Tulips and Heather

I would love to introduce to you a fairly new blog called Tulips and Heather This is my most amazing daughter-in-law's blog. She is one of the most talented, smart, beautiful young women I know. The moment Ron brought her home to visit us, even though it was  past 11PM at night, it was like the sun came out in the house and it didn't set until she left. Because of the distance they are from us, visits will be very rare and most precious, so I am especially pleased to see bits and pieces of their lives by way of her blog. You might enjoy seeing some of her great ideas as well!

Saturday, September 01, 2012

National Sewing Month


September is National Sewing Month! I'd like to invite you to our store, Moonwishes Sewing and Crafts to shop for your sewing pattern needs. We have been listing like crazy the last couple of months and have close to 7800 different patterns in all styles and sizes listed at this point. We have a great selection of costume patterns for the upcoming Halloween and also patterns for church Christmas pageants and choir robes. Yesterday I was busy restocking our Women's Plus size patterns and if you check in the Unisex Pattern category of our patterns you will find even some larger extended size patterns if needed.

We work hard to maintain a large selection of patterns so our customers have a broad choice all in one spot. I also enjoy comparing patterns from current times to those in the past. Some are uncannily the same and others show styles that come around every couple of decades. I've noticed that peplums are coming back in style and the latest Threads Magazine, issue 163, ran an article on designing and adding a peplum to your garment. Peplums were very popular in the 1980's and we have many patterns that feature peplums that you could use for inspiration and a pattern itself, only watch out for the shoulders on these garments! Nothing better than to mix and match pattern pieces and come up with a great outfit. My favorite summer dress is a combination of a Vogue jumper and Simplicity flutter sleeves.

Shop with us any time!

Friday, August 31, 2012

Project Linus Quilts

I was given a big batch of fabric, batting, pre-cut squares and pre-sewn blocks several months ago. I decided to try to make some quick Project Linus quilts with the pre-sewn blocks. I try to make 1-2 quilts for this charity yearly, but find myself rushing to get them done by the official drop off date although they can take them any time of year.

So I sorted through the pre-sewn blocks and found that I had plenty of purple with a purple flower print 9 patch blocks. Problem was I didn't have any of the opposite blocks. With some of the pre-cut squares and making some squares myself, sometimes by picking out and disassembling some blocks to move the fabric into new locations, I had enough blocks to make 2 baby quilts. While they both have much of the same fabric, they coordinate but don't exactly match. It was fun to be able to make them without a lot of cutting and now I have already been able to turn in the quilts and am on to other projects. To quilt the quilt, I used a serpentine stitch down each of the seam lines with my even feed foot attached. I've found that doing a stitch that isn't straight helps to cover up seams that don't quite match!

One of the things that I do while making Project Linus quilts, is practice new techniques and currently I'm working on preparing to bind the quilt and the actual binding. I haven't been happy for years with how my binding looks. I was able to see a Nancy Zieman show (after the quilts were finished) that showed how to make an EASY mitered binding and so with what I trying and the advice she gave, I think my next quilt will have binding to be proud of!


Wednesday, August 29, 2012

Reversible Apron

I've gotten a bit behind in posting about my sewing projects as life just seems to zoom by the older I get! My daughter in law had a birthday last month and I made her another apron as she likes them and had asked me to make them for her. This time I tried something new. I made a reversible butcher apron so she could use whichever side fabric that she wanted or would go with her clothes.
I used McCalls Pattern 5174 (also sold as 0682) as the basis for her apron.
While this particular pattern is now out of print we have bunches of other apron patterns for sales at our store Moonwishes Sewing and Crafts. Just click this link to see them.

I used the butcher or carpenter's apron. Shown in light and dark blue. I tried to pick two different fabrics that would coordinate and also be in the color range that Savannah wears. I cut out two for each pattern piece except for the tie as it needed two of each fabric. The neck strap normally calls for making a tube of fabric and turning it inside out and then edgestitching. Instead I sewed the two different fabrics right side together and turned them inside out and edgestitched. For edgestitching, I use my stitch in the ditch presser foot as I have found it to be the best presser foot for this task.

Instead of the straight ties that were recommended for the carpenter apron, I used the fuller ties that ended with a 45 degree point. Next time I would make them longer though as they were meant for the aprons that reach around the body more than the carpenter apron. One thing I was very careful of, especially when making the points is that I got the left and right side ties made correctly. With the ties made I made pockets and embellished them and attached them to the front of their respective side of the apron. Pockets can be placed at whatever location would be convenient and do not have to be placed exactly where it shows on the pattern tissues.

Once I was done with the ties and pockets, I positioned side on of the apron right side up on my work table, then placed the ties in position and then laid down side two with the right side down. Pinned it all together and took it to the machine to sew up and around and then back down the sides. DO NOT sew down the hem at this point. I then turned the apron inside out, pressed it all carefully and then edgestitched all around the sewn sides of the apron. I turned the bottom of the apron up inside the two layers and then sewed the hem down through both sides. I would think that you could also allow the hem to be hemmed up on each individual side and let it hang loosely or be embellished with trim or a ruffle. I loved the way the apron came out! Modeled by Annabelle the dummy. Note that I got brave and made a rounded pocket on the one apron side.


Tuesday, August 21, 2012

Bra-Making Basics - Threads

Bra-Making Basics - Threads  If you ever wondered about making your own bra, you can download the instructions now and see if this is a sewing challenge that is right for you. Let us know if you found it easy to make or not and what was the most challenging aspect? Measuring and getting the size right? Or perhaps it is finding the bra making basics? Please share with your sister sewers.

How to Make Beaded "Berry" Buttons - Threads

How to Make Beaded "Berry" Buttons - Threads You can download the simple instructions for making these buttons. It seems to me that with some tweaking, they could also be made into brooches to match your garment's fabric.

How to Create a Beautiful Lace Top - Threads

How to Create a Beautiful Lace Top - Threads  This video looks like a super simple lace top for either practicing sewing on lace or just making one of this year's fashion basics!