Moonwishes Sewing and Crafts

Moonwishes Sewing and Crafts
Visit Our Store!

Saturday, March 08, 2014

Hexa-Go-Go: English Paper Piecing 16 Quilt Projects

I don't know why I do this to myself! To relax before bed I was reading this new book I bought on making Hexagons and hexagon projects. I'm really starting to build up a collection of pieced hexagons in 4 different sizes and really need an idea on which way I should head. Well this book, Hexa-Go-Go: English Paper Piecing 16 Quilt Projects  has ideas by the dozen, not just in the book, but in the ideas that blossom in your head while reading the book. Ideas were exploding in my mind to the point that I couldn't sleep last night as I was designing projects in my head and figuring out how to make them work. I definitely have a better idea of what I want to do with all my different hexagons now. And I know this is not a book for bedtime reading.

This book has great full color photos. Most projects are made with very modern prints which I don't go for, but my stash of flowery fabrics and scraps should do very well when being substituted for the modern prints. While I thought making hexagons would be tedious and difficult, I have found them to great to work on while watching TV. I don't go out much so I don't have a portable package of hexagons to work with currently as the author suggests, but I will certainly think about putting a little kit together for extended waits at doctor's offices and waiting for prescriptions to be filled at the drug store. If you have been hesitant to try hexagons might I suggest you give them a try.

You can dip your toes into the water with a couple of quick hexagon projects in a free class at Craftsy 2012 Block of the Month class. I've done all but the last two blocks at this point. The foundation piecing had gotten the best of my dyslexic brain, but when wide awake in my sewing room, I have been trying to push myself along. You would think I would push myself a little more as I can't (my own rules) start another project until this class is finished and cleaned up. Of course making the hexies doesn't count as I do them in front of the TV instead of in front of the sewing machine. Hard to believe it is March already as I started this class last year while my sewing goal was to learn and perfect new techniques.

Friday, January 31, 2014

Quilting Fabric Stashes

I have been quilting since I was in 8th grade or since 1967 however you might want to look at it. My first quilt to me was beautiful but as a quilt it was a disaster. The squares weren't the same size, the seams weren't the same size and many times I sewed the seams with a basting stitch. Big oops! When it came to the fabric for this quilt, I went the old fashioned route. I dove into my mother's leftover scraps 'bag'. I didn't know a single thing about making a quilt other than what little I may have gleaned from reading Laura Ingall's Little House on the Prairie book series. So being ignorant I used any and all fabrics that I found, trying to get enough for a decent sized quilt. This meant that some old leftover green, ugly upholstery fabric was paired up with fragile summer fabrics. 100% cottons were mixed with polyester blends. I didn't finish the quilt until 12th grade and was able to take it away with me to college. It may have been a weird quilt, but from what I had to work with, I feel like for a supposedly unartistic person, the color sense and design was there. I loved that quilt and it cheered me tremendously to see it and use it. Eventually sometime after my first son Ron was born it disintegrated. I can only date it back to Ron as I have a picture of him sitting on it, but never had one of Steve near it. I threw it away and have regretted it ever since. However, what I did do was the leftover blocks were saved in my sewing stuff which amazingly used to fit in a green plastic carrying case that enclosed my quilting, embroidery and mending tools. but I suppose I was ahead of most girls at college who didn't even have a sewing needle with them! One day I found those old blocks and picked them apart, cut them to exact squares and sewed them back together again, getting rid of the green upholstery fabric and and the super thin polyester fabric. One of the prints was leftover from the first dress I ever made myself. hose blocks are still waiting for the perfect project for them.

I missed being in the USA for most of the bicentennial year of 1976 as I went to college in Canada and got to go to Colombia during my summer break. So I missed the start of the ongoing quilting craze and the fabrics that came into being during that point in time in the USA. My second quilt was yet again made out of scrounged fabric. Then I found Eleanor Burn's Log Cabin in a Day book. I had to make one and for the first time in my life I went out and bought quilting fabric to make a quilt. Of course there were leftovers and also the quilting bug really bit at that point or was it the accumulation of quilting fabric bug? Anyhow I bought fabric. I made quilts. I bought more fabric. People found out I quilted and was into other sewing expressions as well, so I was given 'gifts' of their fabric and tools that they no longer wanted. Yard sales started having quilting fabric and sewing notions for sale and I bought as I had funds. Then our wonderful thrift store opened and I bought more fabric. I was given more fabric. Now I have enough fabric to make projects for the next several hundred years! Yet I still don't understand the immense amount of books that are geared to getting rid of your stash. Why would I want to do that???

In the last little while, I realized that the lap quilt I used in my sitting spot in the living room had bit the dust and was full of tears and stains and needed to be replaced. So I'm borrowing a lap quilt I made for Hubby while I  am getting inspired  and start to make a new lap quilt. One of the first things I did was to scrounge through all the pre-made blocks I've been making and storing for years. Maybe you know what I mean. You finish a quilt project and you have some pieces leftover that make up a nice block and so you sew it together and then set it aside as you don't have anything to go with it. As I dug deeper into into my box of UFOs I found one piece where I had sewn four blocks together and then put the project away as it didn't look right. The blocks weren't all the same sizes so it wasn't going to work in the way I had planned at first so it was put away. So tonight I sat down to do one of my most unfavorite sewing projects--unsewing. Picked out two of the blocks that I thought would go with the other pieces of the lap quilt I want to make. Unsewing gives you time to think and I started to realize how long ago I had made the blocks (20+ years) and the type of fabric I had used. All were small prints or tiny dots. While they all coordinated, they sure don't look like the kind of fabrics that I use now. I love big flowery prints with coordinating fabrics (not necessarily from the same manufacturer) and have plenty of them stashed away.

Your favorite types of quilt prints/designs is the main reason to build up your stash with the kind of fabrics you like and enjoy using. I have plenty of fabric at this point as I have mentioned. I'm not a modern art quilter. I really don't like the huge geometric prints, nor many of the colors that are current today. So I'm not inclined to feel like I have to buy ANY fabric at this point (it helps to not have the money to be buying more fabric LOL!). I have plenty of my kind of fabric so I don't HAVE to buy more fabric. It isn't like I'm going to ever run out. When I do get a chance to buy quilting fabric at our thrift store, I will generally pick it up no matter what it looks like as they sell for 25-50 cents a yard! You can't pass that up that kind of bargain and I have found that bringing some kind of new fabric into my sewing room helps with inspiring me.

Quilting, embroidery and sewing are such wonderful creative hobbies to have. Even when my arthritis has gotten me down so that I can't do much of anything physical, I can still read books and magazines about the needle arts.

Friday, January 17, 2014

Making Hexagons for Quilting and Crafting Part 2


After posting my last entry earlier today, on making hexagons using the Fiskars hexagon punch, I decided to see how much bigger paper template you would need to be able to combine them with hexagons cut from 2 1/2" strip templates (mine is from Fons & Porter). Well, what a surprise at how close they are! The photo above is actually green batik cut from a 2 1/2" strip and then I ironed a freezer paper template punched out with the X-Large hexagon punch on to it. It is a tad smaller than it could be by 1/16 - 1/8". As long as you don't flip back and forth between punched templates and traced templates, you should end up with the same size basted hexagons and they would work up together with no problems. On a really huge project, you might lose an inch or two, but with smaller projects the slight difference in size won't make me go back to tracing or cutting paper templates out individually.

Making Hexagons for Quilting and Crafting


Since taking the Craftsy 2012 BOM class, I have been fascinated with hexagons and have spent plenty of evenings basting them with the thoughts of someday making something special with them. One difficult thing for me however, is cutting out all the paper templates so my fabric wraps around it and sews up accurately. One night hubby was surfing the internet and found these and told me to go ahead and try them. They are Fiskars Hexagon Punch tool. Currently they come in three sizes; Medium 159070-1001  0.50" on each side, Large 159080-1001  0.75" on each side and Extra Large 159090-1001 1" on each side. Maybe if enough quilters like them we could encourage Fiskars to make them in some even larger sizes as well. Currently Fiskars  promotes them as crafting/scrapbook notions.

When I make hexagons I use freezer paper to make the paper template, iron it waxy side down to the wrong side of the fabric and then cut them out leaving a 1/4" seam allowance on each side. You can trace your own sizes on the freezer paper out of the roll that is sold at the grocery store or from freezer paper that is made to go through the printer so that the template will be printed out for you and then all you have to do is cut them out and then iron them onto fabric etc. It is the tracing of the template and cutting them out that becomes difficult for everyone I am sure, and especially difficult for those of us with arthritis in our hands.

When I got the Large and X-Large punches in the mail the other day, I set out to see how they worked and if they would make nice and exact templates. I ended up with a minimal amount of 'hanging chads' on two of the sides, but each side was precisely cut (or bent--those sides with the chads) and the 'chads' could be worked around. Then hubby got involved and discovered that if you put freezer paper doubled over with the two waxy sides together, you would get a nice clean punch out with no 'chads' and to top it off you would get two punches for the work of one! I also tried to see if the punch would cut through fabric, but it didn't and it had not been advertised saying it would be. While the punch itself  felt somewhat heavy and sturdy in my hands, it was easy to squeeze the punch and have the templates pop out.

These punches will really move along my hexagon making as it cuts out so much wasted time. If, like me, you use freezer paper as a stabilizer for other projects, leftover bits can be punched to make templates from the odd sizes, thus eliminating waste. I had a spare minute last night and a leftover piece of freezer paper just begging to be put to good use and in that minute, I had about 12 templates punched out! It would have taken a lot more time than that to cut them out manually.

The only problem with these punches is they don't go up to large enough sizes. While there are several different acrylic templates for cutting 2 1/2" strips into hexagon fabric pieces, you still have to cut out a paper template, so a punch that handles that size of template would be fantastic. If you like these punches write to Fiskars and encourage them to make larger sizes. How will companies know what we want unless we tell them? I bought my punches on line and they can easily be found. Do price comparisons to see if you can get a bargain (as they are all made by Fiskars). I found mine for almost half off.

Saturday, January 11, 2014

An Embroidery Pattern Book

The joys of Pinterest and the internet. Last night while seeing some of the newest pins coming my way, I saw a pin for an old book called, An Embroidery Pattern Book  Today I checked it's source out to find it is part of the Open Library and I could have a copy of the book sent for FREE to my Kindle. I saw some of the pictures before downloading it and I think that anyone who does hand embroidery and those who digitize their own designs might see and receive some interesting ideas for their work.

You can find the book Here.  Enjoy!

Monday, January 06, 2014

Life is {Sew} Daily: {Sewing Basics}

Life is {Sew} Daily: {Sewing Basics}: Sewing Kit Essentials How to Thread a Sewing Machine How to Make a Sash How to Make Cording/Piping How to Install a Zipper - ...  Check out this blog where you can learn all sorts of sewing techniques and other aspects of running a home by a Home Economics teacher.

Saturday, January 04, 2014

Wonderbag Portable Slow Cooker

Once in awhile I see something that I would like to share, that doesn't fit in with this sewing blog or my reading blog so I usually skip it. Today however, I just saw something unique that readers might be interested in checking out and felt compelled to share. It is called the Wonderbag Portable Slow Cooker .  This reminds me of the things that they talked about with the Y2K scare as a way to cook without using precious fuel.

Basically  you chop your food up, bring it up to boiling and then put it in this Wonderbag, and it continues to cook for hours in an insulated bag that retains the heat from the initial bringing the contains up to boiling. Other that the stove to bring the food to the temperature for cooking, it uses no fuel, no electric plugs, nothing. Greatly economical to use.

The most interesting part of all this, I thought, is if you buy one for yourself another is donated to a family in Africa so that they can use it for cooking and thus save precious and expensive wood for cooking. When I see on PBS specials what many African women go through daily to gather fuel, water and prep food, this would be more marvelous than anything they could imagine. My heart for several years now has gone out to third world women and their need to help support their families. Ten per cent of  the profits from out store, Moonwishes Sewing and Crafts, goes to help women learn to sew and make crafts and be able to support their families other than by prostitution. I also collect embroidery supplies that I pass on to a missionary friend in the Congo that helps women in her area learn to embroider so they can sell their creations, also yet again to learn that they do have skills and talents above prostitution. This Wonderbag is yet another way for these women to support themselves and ease their financial situation.

I urge you to check this out, research it, ask questions of those who have bought one (I haven't, I only just saw it advertised a few minutes ago) and see if this is something you would like to have and use to also help support women in Africa. Crafting provides a world wide bond among women, and what better way to show your additional support for your sisters around the world than to help ease their financial burdens?

Wednesday, January 01, 2014

Hexies - Betcha can't make just one!

I had always looked at hexagon quilting projects as something that would be horribly difficult to do. Then I took a Craftsy class in 2013 that involved making two blocks using hexagons. I couldn't believe how easy they were. Soon my Pinterest>Quilting>Hexagons was getting fuller and fuller. First with hexagon quilts both antique and vintage, then variations on a theme with some of the hexagons being used were pieced themselves, and then seeing embroidered hexagons, and all sorts of interesting creations. I find them fascinating. I want to make a hexagon something. I want to use my silk ties from the thrift shop in a hexie quilt or wall-hanging.

One of the things that I have always done with my quilting is when I'm done with a project, the leftovers are cut into set sizes so it is easier to make quicky quilts. I sat down to clean up my latest sewing 'mess' and realized that some scraps that aren't big enough for my pre-cuts are still big enough to make a hexagon out of it. So the other night, I cut up a bunch of scraps into hexagons and sat down and started hand sewing them. I couldn't stop. Remember the old Lays potato chip jingle - betcha can't eat just one. Well that is what it feels like when I start sewing hexagons! I had made 20 in three different sizes before I forced myself to quit so I would be able to use my hands the next day (the downside to rheumatoid arthritis).

I especially love the looks of hexagons with embroidery and the ones with a binding around them looks interesting as well. I have found several websites that they tell how they are made, at least I assume so. The sites are all in French and it has been a very long time since High School French class. Anyone out there know some good books that I could use for a reference? I'm also trying to find one or two basic hexagon quilting books, Any one with a good recommendation? I'm thinking of these ones.

Sunday, December 29, 2013

Hexagons in the Hoop

Since making my BOM blocks that featured hexagons, I have been fascinated with them. Up to then they always looked to be just so much hard work. Then I made my first one and couldn't stop. Just ran into something a few minutes ago, that for those of you that would like the hexagon style but not the by hand work, here is a site that sells a make a hexagon in a hoop machine embroidery designs.


There are 15 components to the design, and several different pack components with different prices. Currently the whole pack is on sale for $23.95 until 1-24-14. They are also reversible. Looks very simple and lovely especially if you take the time to coordinate your colors and prints. The middle portion has different decorative designs while the outer petals have different line designs.

For those that would prefer to make hexagons the old fashioned way, check out my Pinterest board for Quilting -- Hexagons for some great ideas. Or you can check out one of these books on making hexagons that are on my Amazon wish list. If you have any of these books, which would you recommend? I especially am interest in making hexagons with embroidery in the middle. If you know of a good instruction book for that, PLEASE let me know!

Friday, December 27, 2013

Merry Christmas and Happy New Year

I hope everyone had a Merry Christmas and will have a great New Year. This was a really simple Christmas for us. got to see my son Ron and his lovely wife Savannah (he won the jackpot with her!) and our other son Steve. Savannah made us a nice meal since I wasn't up to it. I've been having a rather rough time with a new med>bad reaction>get off new med on top of everything else. Then we opened our presents.

So glad for the internet as I was able to get most gifts on line and it looked like others did too. I feel like I made out like a bandit although probably not a lot by many people's standards but our family stays simple. I got three needlework books as gifts as well as was given a book on Ohio quilts. Steve who tapes Restaurant Impossible and brings it over to watch with us also gave me a cookbook by Robert Irwin. Hubby who has seen how I love the show Call the Midwife, gave me three Kindle books of the series. Other than a DVD, all I got for Christmas was BOOKS and more BOOKS! Yeah. They will keep me busy for at least a week or two. Two of the books are on the history of embroidery (hand) in the 18th and also the 19th centuries. Lots of pictures so you can really follow along with the exquisite work shown, read and learn to improve your own embroidery.

The really big news I'm hoping for those that read my blogs is that we have been able to get whole house WiFi so hubby and I don't have to take turns with the one computer connected to the satellite, now the laptop is as well so I have more time to write and post blog entries much more frequently than in the past. I've been spending this past year trying to improve my quilting/piecing techniques by following a Block of the Month class on Craftys. I haven't quite finished my blocks and still have three to go. I'm 'cheating' on my second Drunkards Path block as I hated the regular technique. If it works out, I will post instructions and pictures here.

Anyone else get some amazing needlework books that they want to recommend? Let me know so I can get it on my wishlist!


Tuesday, October 08, 2013

Pillowcase Dress for Women


This past summer, our area had some truly funky weather. A very wet spring that moved into a fairly cool summer and then a week of heat that felt like we were in the desert. At that point I knew I needed another summer dress and I needed one that was easy to make. So I figured that since pillowcase dresses are easy to make for little girls, why not make one for this grown up girl? I pulled out some fabric that has been mellowing for over 20 years that I had bought in Antigua during a Doreen Speckman quilting cruise. I measured how long I wanted it from above the bust line to were it would hit on my legs. Added on enough to make a fairly wide casing at the top for 3/4" elastic as well as enough fabric for a 2" hem. Used my rotary cutter, ruler and mat to cut the piece. Sewed the casing and ran the elastic through it. Adjusted the elastic so it wasn't cutting off any vital circulation and yet wasn't so loose that I would have a wardrobe malfunction. Cut fabric for straps (made from wide fabric tubes) and then with a bra on tried to adjust the straps so that not only would they stay up, but would mostly cover my bra straps. I realize that it is the latest fashion apparently to have all your straps showing, but that isn't my style! Added some patch pockets to both sides and I was done. This actually took me several days to do all this, but actual sewing room time was probably only an hour and half at most. I just run out of steam sooner than I used to.

The nice thing was I actually had several short sleeve tops that coordinated with some of the bright colors in the dress that I can wear under the dress if I go into town so it works very well as a jumper. I'm hoping to make one out of somewhat heavier fabric for winter. It isn't that I don't have some really great sewing patterns that I could use (see my store), but my sewing time is so limited by my health needs that I need to make things faster and easier if possible. So if you need a sundress quick, this is a style to try, especially if you get last minute tickets to a Caribbean cruise this winter!

Tuesday, September 24, 2013

Janome 15000


Available October 1, 2013, Janome's latest "baby" the new Janome Memory Craft 15000 sewing/embroidery/quilting machine. From what I've seen, I'm getting that "Be still my heart" feeling, especially when I saw it quilting. Although my machine set up is very good at this point, quilting by machine using embroidery/quilting designs is still difficult for me as I only have approximately a 5" x 7" area before I have to re-hoop which ends up with puckers and designs that aren't always precise when coming together. I generally end up doing a modified stitch in the ditch with decorative stitches, especially on my Project Linus quilts. I would love to see what I could do with them with this machine.

I just have to face it. I love Janome sewing machines and the more do-dads and features the better I like them. I am however, waiting for the day they come with the ability to cut fabric and also dispense chocolate! LOL

If you are interested in seeing what this machine can do, here are some links to  YouTube videos of it in action. I'm sure you will be as impressed as I am.

http://www.youtube.com/watch?v=CSqhK8MNHTc
http://www.youtube.com/watch?v=miLr0Nqo3lU
http://www.youtube.com/watch?v=3Oaj0yvQ_rY
http://www.youtube.com/watch?v=PprjWENH9XE


Saturday, September 14, 2013

More Craftsy BOM Blocks finished!


Well I am behind in keeping up with this blog and with making my blocks for the Craftsy BOM 2012 class. I had to stop trying temporarily doing the 2013 class as one class was taking me awhile. I'm on a new medication that is actually helping my arthritis (Remicade), but it involves trips to the doctor's office for the IV infusions every 8 weeks, and since I am feeling somewhat better, I've been trying to catch up with things that haven't been taken care of. My life is a constant round of playing catch up, and just when I think I'm getting on top of things I flare up. Oh well, such is my life.


I'm very proud of some of these blocks even though there are some errors with them. I try and try and measure and do what I think I'm supposed to, but every time I applique something onto a block I get it lopsided. :(  Some of the blocks were very easy and the types of things that I have done before, but others without this class I would have NEVER in my life attempted. That is the whole point of taking these classes for me. I promised myself that this year would be a year of learning and NO skimming something because it looked hard and I'm thrilled with my results. I've made close to a hundred quilts at this point, but I knew I was not doing some of the finer details correctly which was throwing off my blocks. The biggest thing was getting my needle set in the right position so I truly have a 1/4" seam. That is so huge of a point to know when piecing quilt blocks. I wish I had done this long ago. I have my sewing machine set to always bring up the right needle position and the right amount of stitches per inch each time I piece so I don't have to reset everything each time I come back to sew. Saves a lot of grief. On my Janome 7700 it is stitch 93 with the needle position at 4.6 (it barely misses the side of the presser foot.


The really new thing I learned with my April blocks (showing at top) was how to make hexagons by HAND and sew them together by HAND!!! I have never attempted doing English paper piecing prior to these two blocks but with the help of Printable Freezer Paper that can be printed on in my printer and a website that will make up the right size graph of hexagons for you, it became very easy to do. I enjoyed making the hexagons and want to make more of them and do more projects with them including doing something like embroidering on them as I have seen in Pinterest. I just LOVE Pinterest for all it's great ideas! One of the hexagon designs was supposed to be a minimalist landscape but that didn't go with the colors I have been using, so I went for a fireworks type block. It was fun but yet again I had it appliqued off center.

Several of the other blocks involved using what I would consider scraps. Since those blocks started fairly early in the 'year' of this class I was being forced to cut into whole chunks of fabric to get some of the pieces I needed. The whole time I'm hoping that I will have enough of the larger pieces of fabrics as I come to the end of the blocks I have to make. With my BOM 2013  it won't be such a big problem as I'm doing those blocks in florals and will never run out of those types of fabrics. While this is supposed to be one quilt at the end, I'm hoping to be able to make two Project Linus quilts out of the blocks.

Currently I'm working on blocks that are made with Dresden Plates, yet another type of block I have never done and one that would not have turned out at all unless you sew an extremely accurate seam.

Friday, September 06, 2013

Sale at Moonwishes Sewing and Crafts


In celebration of September, National Sewing Month, Moonwishes Sewing and Crafts has all its patterns discounted 10% for the whole month. Except for a very rare pattern, all our patterns are uncut, unused, factory folded. No having to root through a pattern to hope all parts are there and in the right size. We have over 8000 sewing patterns currently in our store in all sorts of styles and sizes. Patterns for Men and babies, boys and girls, pajamas to wedding gowns. Come and visit
soon to see us and experience our outstanding customer service.

Wednesday, July 24, 2013

Embroidery Library 2013 Christmas Club

It is time to join the Embroidery Library 2013 Christmas Club now so you don't lose out on benefits such as free Christmas designs, discounted prices, and earn points towards a gift certificate to use at embroidery library.

Thursday, June 27, 2013

Craftsy Block of the Month March 2012

Okay, I know it is way past March at this point. When I signed up for my classes, I was really hoping that I would feel well enough to do 4 blocks in a month. Unfortunately, I didn't and I just this past week managed to get these two blocks finished from the Craftsy BOM March 2012. I enjoyed making these blocks, but really feel that logically they should have come at the end of the other blocks when there would be a lot of scraps left over and we wouldn't need to scrounge scraps that matched. I was scared I'll run out of the fabric that I have set aside for the other blocks I'll be making (as I get to them). I will be using these blocks in a Project Linus quilt, so they are in bright red, white and blue colors for the most part. Scrap blocks are always my most favorite type of block to make.


Saturday, April 27, 2013

My Favorite Embroidery Books


Not only was I able to buy some embroidery floss as stated in my post yesterday, I was also able to get two more all purpose embroidery books. Why does someone need more than one? Well why not. Also since I review books I look at them in regards to completeness and which one might be the best to reccommend. In this instance, if you have the money, buy all three. If you don't have the money and are a new embroiderer and just learning stitches, then I recommend The Embroiderer's Handbook. It contains several photos of how to make the different stitches and so whould be easier to learn from. The other two books, (my new ones) are Donna Kooler's Encyclopedia of Needlework and Mary Thomas's Dictionary of Embroidery Stitches. Both these books would be a good choice although they do have their differences. Donna's book has a lot of embroidery history, a large bibliography of other embroidery works, several lovely projects and a stitch index. Mary's book has a bit more detail when it comes to the stitches and also something I didn't see in the other books. Her books have what they call composite band stitches. This is the same as what machine embroiderer's call stitch stacking or building. They show combinations of the different stitches that are used to make fancy bands which either can take some of the thinking off of you or inspire you to try bigger and better stitch bands. Each of these books are unique and would be good references for you.

Friday, April 26, 2013

My kind of paint box!

I did a project about a month ago that rewarded me with a very large Amazon.com gift certificate. Let's just say I was in my glory. I have been going through my wish list, checking out the latest needlework books and magazines and also threads that Amazon.com now carries. They have come a long way from just being a media/book store.

I was very happy to find this set of DMC Stitcher's Palette Color Variations - 36 different embroidery floss colors. I had run into these types of floss before at Michael's but couldn't afford at the time to buy more than a few. I was very happy to find them for sale on Amazon.com.


The picture of these threads doesn't even begin to do them justice. They are gorgeous. They contain the colors of a wonderful Lake Erie sunset, the color of sand on the beach, flowers and water, trees and sky. I am of two mindsets. I can hardly wait to use them. Or I don't want to use them but just look at them as they are so pretty! Whichever I choose, I know I will have them for awhile as my hand embroidery has to relegated to small segments of time currently as my hands have been hurting a lot lately.

While my box of floss came sealed, it was missing one instruction/graph booklet. It also had a pack of needles and a piece of mottled sand colored fabric to sew on. I had been so excited about finding the floss that I didn't even pay attention to the other parts of the set.

Tuesday, March 26, 2013

Thrift store score!


Found 12 of these 12 1/2" square whitework napkins at the thrift store the other day!

Tuesday, February 26, 2013

Craftsy February BOM Classes

I have finished my blocks for Craftsy's 2012 and 2013 Block of the Month. this is great practice for me even though I have been making quilts for a long time. I'm working hard on keeping to a scant 1/4" seam when piecing. I pull out the seam ripper when unsewing is needed. For the 2013 class, I'm having fun using scraps and pre-cut pieces made from leftover projects. I've certainly been enjoying myself. I'm also working on a Stupendous Stitching class, but am still working on my Stitch bible before I go any further with that class. I'm enjoying my sewing, what little I have down, this year very much. taking the time to review and improve techniques is going to really help my sewing in the future. I'm also working on embroidering another set of pillowcases and am learning how to do some interesting stitches instead of whatever is the fastest.

The two blocks that have lots of blue in them will probably be going into a Project Linus quilt. Since my lap quilt that I use all the time is literally shredding and falling apart after many years of hard use, the flowery blocks will go into a lap quilt for me.


Sunday, February 17, 2013

Magazine 'Jackpot"

On Friday, I had to run some last minute errands before things like the library and bank closed. when I got to the library 5 minutes before they locked the doors, I returned my library book and checked the shelves of items for sale. I found 17 magazines on quilting and other topics, paid and was on my way. Not only do I love looking through magazines to get ideas, I have found that they are great for taking my mind off of pain in the midst of a major flare up. God is good. He knew the flare-up was coming and provided for it. All told I got 13 quilting magazines, only one of which I had ever seen before, a jewelry magazine, a crafting one and two magazines called Where Women Create. These books are more than just how to set up your sewing, crafting, painting, etc. space, but they also tell about the women that work in them. They tell what inspired them in their work, how they built their business, websites to learn more etc. I suspect I will find them to be good resources for many reasons.

I'm currently in the midst of one of the worst rheumatoid arthritis flare-ups that I've had in a long time. I get them often but not usually to the extent that I feel like I've been run over by a couple of Mack trucks. But if you can imagine that, this has been my last two days. I'm so glad for the provision of new 'picture books' for me as I get over the pain. I've also got a few more books on  my wish list, now that I have seen her magazines and that is Jo Packhan and her books and magazines on Where Women Create .

Now off to a little Pinterest pinning, since I only have to use one finger, and then back to my nest and my pile of 'treasure'.

Friday, February 08, 2013

Won Another Prize!

What fun getting the mail today to discover that I had won another prize in Vogue Patterns Magazine December/January 2013 giveaway. Last year I won an ironing board. Funny thing I had just remembered that I hadn't entered the current issue's giveaway and was just coming down to do it when I saw my prize. This time I won something that would have been truly great when I was traveling on the road a lot more, but it will still come in handy. I won a Eucalan Getaway Gang. A pouch with a nail file, tiny sewing kit (including airport safe scissors), 8 delicate wash packets, 4 stain treating wipes, and 20 lint remover sheets. These are eco-friendly items using natural ingredients. You can find out more about their products at www.eucalan.com .

Wednesday, January 23, 2013

Practicing Circular Stitching

My hubby got me a circular stitcher accessory for my Janome 7700 for Christmas. I had been wanting one since this machine has all sorts of decorative stitches. I had a bit of a difficult time installing it on my machine but that could have very well been weakness in my hands form the arthritis. I had found on the Bernina website a project for learning to use their circular stitcher. I don't care where I find ideas, if my machine can do them, I will try them out. So I printed out the instructions and photo of the project and went to town. What fun! You can do some amazing things with a circular stitcher, but it pays to practice. You have to learn not only how to set up the design, you have to learn which designs work well in circles and how to hold the fabric. Here is part of the sample that I made.

I decided that the smaller circle would look good with a button and since I had just found a little bag of buttons at my thrift store and one was the perfect color, I used it. I have had machines that have had the capability to sew on a button with the included button foot for at least 20+ years and have never sewed a button on with the machine before. I think I was always sure I would break a needle or in some way damage something. Instead I have either avoided buttons altogether or sewed them on by hand, making a mess of knots in the back. I do quite nice embroidery but buttons baffle me. With some directions from The Sewing Machine Accessory Bible, which is a great book on presser feet by the way, I attached that button foot and did a little adjusting and in no time I had sewn on a button. No snarls , knots or tangles on the back either. The only problem that I had was getting the button exactly where I wanted it. It was supposed to be in the center of the circle yet it is off center.

The circle that the button is in is fringe I made with the circular attachment by sewing a close zigzag at 7mm and then sewing on the far left of the satin stitch with a straight stitch. I did get a little wobbly, so yet another thing to practice. After sewing the satin stitch and then the stitch to hold them down, go to the back of the fabric and snip the bobbin thread and if you did it right, you end up with fringe which would make a great flower.


Monday, January 14, 2013

My Sewing ME Year

Most years lately I have been finding myself working on large sewing projects, that haven't left me much time for doing any sewing for me, practicing new techniques or improving my skills. Before 2013 even got here, I decided that this would be my ME year. I want to work on bettering my skills, learning new things, and making projects that strike my fancy and also clean up the clutter in my sewing room.

To begin this quest, I signed up for several Craftsy classes. I signed up for their 2012 and 2013 Block of the Month classes and also Stupdendous Stitching. I spent some time on a Bernina website and found some interesting projects using a circular stitcher that I had gotten for Christmas. Well I have already finished my BOM blocks for both classes for the month of January and am working on a circular stitcher project. The only thing left is to start in on the Stitching class. I have over 200 decorative stitches on my sewing machine and I want to learn how to use them effectively.


My last several quilts, although I worked hard to make everything come out right, my blocks ended up the wrong size. When I started the 2013 BOM block, I did my usual thing and found the blocks were quickly getting to be the wrong size besides I was working with fabrics I didn't really like. So, I took careful measurements and shifted my needles position and set my needle at a 4.6 width instead of the 3.5 and put the cloth guide that came with my machine in place. I also picked some fabric that I liked better and was very happy to make 4 -  6 1/2" blocks that were the right size. Too bad I hadn't done this years ago, all my quilts would have turned out better. But, this is the reason that I need this year to slow down and take my time getting things right.

Wednesday, December 26, 2012

Latest Quilt


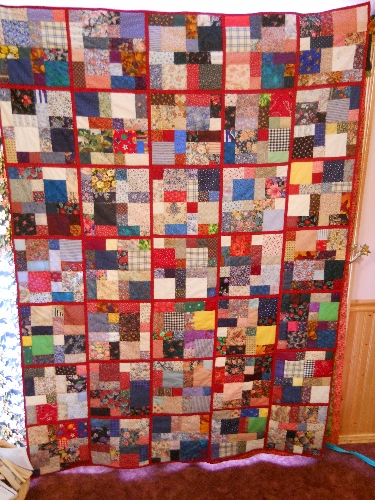
Now that Christmas has been here and the presents are opened, I can now share my latest quilt project that I made for my son Steve. Steve is 6'2" I believe, so the quilt had to be pretty large to fit over him. I made it approximately 7' x 5'. I used plenty of scraps in it that were already pre-cut in the 4 and 2" squares and the 4x2" rectangles that I have mentioned before. See what a help that can be to have those cut out ahead of time? Some of the scraps in this quilt are from Ron and Savannah's wedding tablecloths that I snitched with permission, and also scraps from just about every special person I have made a quilt for including an old boyfriend that remains a friend to this day. Steve may not know all the memories, but they are there. I put this quilt together in a quilt as you go technique that I keep trying to improve on (at least my technique) so that it doesn't kill me with my arthritis to make a large quilt, but at this point, I think I am going to cry 'uncle'. Even with doing the quilt in sections, when I finally put the last two together (which was the whole bulk of the quilt) the muscles in my neck, shoulders and hands were cramping up like crazy. One thing I did do that was a huge help was binding the long edges and mitering the corners before putting all the sections together so I wasn't having to manipulate all that fabric and batting. It was just quick work to finish the binding on the top and bottom when I put all the sections together. I even MITERED the corners! A first for me thanks to a Nancy Zieman video that I watched enough times that dyslexic me could figure out which way to bend the binding strips.


I reference Sharon Pedersons' Reversible Quilts books each time I do a quilt as you go quilt and they are a big help. Until just a few minutes ago I didn't realize that she had a DVD out, but I bet it would be a really big help. The back of each of the blocks in Steve's quilt is a different fabric so he can use it either direction. It is such a bright quilt, I called it Steve's Happy Quilt, becuase how can you wake up sad after sleeping under it? this quilt was made entirely on my Janome 7700 Horizon sewing machine.


Couture Techniques for a Better Fitting Waistband - Threads

Couture Techniques for a Better Fitting Waistband - Threads  Check out this interesting article from Threads magazine!

Wednesday, December 19, 2012

Make a Snowflake for the Students of Sandy Hook

Make a Snowflake for the Students of Sandy Hook  Following the tragedy AT Sandy Hook School the PTA is wanting to decorate the school as a winter wonderland for when the students come back by decorating it with snowflakes. If you have access to an embroidery machine, Embroidery Library is giving away a free lace snowflake design in three sizes that you can make. They would like to have all the snowflakes arrive at there office by January 12, 2013. Please visit the link to Embroidery Library for full instructions and the download to the snowflakes. If you can't machine embroider, I'm sure that they are taking any sort of pretty snowflake. Let's all do what we can to help these children return to some sort of normalcy in their lives and show the parents we care!

Saturday, December 08, 2012

Embroidered Pillowcases


Year's ago I was given a big box of Work Basket Magazines. I didn't really want to keep all of them, but before disposing of them, I did go through them first and removed all the embroidery transfers that were in them. When I decided a few weeks ago that I wanted to embroider some pillowcases, I went through the transfers and found one that I liked and used them to put the design on the pillowcases. The nice thing about using these transfers is you don't have any concept of what colors to use or what stitches to use. You get to be as creative as you want. I pulled out my copy of The Embroiderer's Handbook which I have found to be the BEST embroidery stitch guide I have ever seen and started sewing. I used several stitches that I had never used before and also some variegated threads, especially for the birds. For the bird I used the Fishbone Stitch found on page 73 of the book. For the green leaves I used Lattice Couching found on page 99 (I do need a bit more practice with that stitch), I also used a long stitch with a French Knot on the end for the pistils of the flowers. I enjoyed my time sitting and stitching. I also found when stitching I tend to not much which has it's own benefits!


Tuesday, November 27, 2012

How to Miter the Inside Corner of a Hong Kong Finish - Threads

How to Miter the Inside Corner of a Hong Kong Finish - Threads

Another great idea from Kenneth King and Threads magazine. One reader commented that this would be a good way to bind an inside corner of a quilt, so most any inside corner binding would profit from this information.

Thursday, November 15, 2012

Pinterest

I had been hearing of Pinterest for awhile and a few weeks ago finally checked it out and joined. I love this site and most seamstresses and quilters would. It is pretty much photo based and when you see some photo of a gorgeous quilt or sewing project, you can 'pin' it to your board and be able to refer back to it later. You can also sort what you save by different boards, like recipes, sewing ideas, Christmas, your own projects, whatever you want and whatever you want to call them to help you remember what is in them. I have a board called Inspiration that has photos of all sorts of things from wedding cakes, architecture, fishes, sky scenes, etc. If something appeals to me whatever the reason such as colors being used together, shapes that might make a great quilt, and so on, I pin it onto my Inspiration board. For those of us without ready access to a camera (or the ability to take decent photos) this is a great substitute and wonderful way to keep track of ideas, kind of like a file folder full of pages torn out of magazines that inspire you.

Anyhow, if you aren't acquainted with the site, I thought I would mention it in case it would appeal you whatever type of sewing or craft work that you do. You have to be invited to join (don't ask me why) and I can send invites to anyone that would like one, and NO I do not get paid for bringing in new people. Some of you have fantastic quilts and sewing projects that the world should see and Pinterest is a great place to share them. I have found spending some time on Pinterest at the end of the day is a very calming thing and seeing all the DIY ideas gives me hope that our next generation really will be sewing and crafting and carrying on our work as sewists.

Saturday, November 10, 2012

New Quilting Books

I will admit being addicted to books and especially sewing and quilting books. I was feeling very well the other day, so on top of running some necessary errands which usually leave me wiped out, I ended up at Joann Fabrics in front of the quilt book display (40% off no less)! I couldn't resist and two books and one magazine got popped into my cart. While many of the books on the display would have been of interest to me, when I picked these books up, they were so compelling I just knew I had to read them and study them. Of course, bringing them home made me want to try things out, except the elves have taken over my sewing room until December 25th. Until those projects are done I CAN NOT start another one except in my mind!!! See I'm being firm with myself.

The first one was Easy Grid Quilts . I have been seeing it advertised in quilting magazines, but the title didn't really help me understand the book and even though the front cover showed a compelling quilt I wasn't sure what it was about. Wow! What a book, especially for someone like me. When I finish any quilt project, all scraps are cut into set sizes of pieces. Generally I cut them into 2 1/2" squares, 4 1/2" squares and a 2 1/2" x 4 1/2" rectangle, but I have plenty of other size pre-cut squares and pre-sewn pieces. In other words, I could probably make one of her quilts without cutting any fabric at this point. See why I have to hold myself off of starting any new project until Christmas is done? Her whole book shows that by following a particular grid with set sizes of blocks, with set colors or fabrics, and even including applique if you like; you can make a fantastic quilt. She actually shows several different type grids in the book. For those that have lots of pre-cut pieces that you want to try something new with this might be a good book for you to check out.

The other book I got was Thread Magic Garden: Create Enchanted Quilts with Thread Painting & Pattern-Free Appliqué.  While the author's quilts aren't technically the type of quilt that I would want to make, I did want to learn her techniques. When I opened the book in the store, I realized that I would really have to study the book. It wasn't just something that you can flip through and remember everything like some books. I'm not done studying it or reading it yet. However, this morning on the Quilting Arts TV show, Ellen Anne Eddy, was featured and she showed how she did what she talks about in her book so that really was helpful, besides she was a very funny lady. If you want to learn how to thread pain flowers, this book would be a good reference and instruction source for you.

Saturday, October 27, 2012

Recycled Pants = Skirt

Several months or possibly a year ago, Vogue Patterns magazine published an article on converting a pair of pants into a skirt, without the resulting 'hippy/boho' look that usually happens. I'd been wanting to try that as I usually wear skirts, so took a pair of green corduory pants that were a good 12 or more years old but were wearing like iron to try out the project. Found that the skirt ended up too short for my nasty looking knees, so added another strip of corduory from the leftover legs and a nice chunk of lace and my knees are covered. Instead of 'hippy' I got 'old fashioned' style! Oh well, not something most women my age would probably wear, but I'm happy to have something 'new' to wear. Now I have to decide if I want to do this with some of the many pairs of jeans I have that aren't getting worn.

Tuesday, October 23, 2012

New Addition to My Sewing Room

Since our last desktop computer bit the bullet, I haven't done any machine embroidery. For some reason, my Customizer program never got installed on the newest computer even though it was on my laptop. But the laptop wasn't connected to a computer and I now needed a doohickey so that I could use the memory card in my 300e. The worst thing about sewing and computer stuff is how easily they go out of date. Anyhow, I realized that part of my problem in getting behind in embroidery projects, other than just poor health and lack of time, is that I have always had my computer and printer right next to my machine so that sewing out a designs after printing a template was super easy. Well a few weeks ago when I got my list from Amazon on items that I could pick to review, there was a printer on the list! I managed to get it (usually things like that disappear before I ever get a chance to see it). So our newest member in our computing family is a Samsung color laser printer! It arrived and with no particular 'need' for a printer Hubby and I discussed where to put it for awhile. Since the toners for this printer are rather expensive and the paper tray doesn't hold much, we knew we couldn't use it for the routine office work for our business. So now my sewing room has a new, very special color printer. The printouts in color are terrific. Laser is so much better than ink jet! I got it set up and my laptop besides it with the Janome 300E off to the side of me and suddenly I felt at home again. I was able to print out in color templates for a Christmas gift I want to make. Now I can do what I need to without having to bother hubby while he is on the computer. I'm still trying to sort out and straighten up the sewing room and then it is back to the quilt I'm making for someone specials Christmas present and have another present embroidering out at the same time. What fun!

If you want to see what I got, click on the Amazon link below. I don't expect you to buy it, but if you need a great color printer, this is a nice one. I'm just happy to have a new 'toy'.

Thursday, October 11, 2012

How to Make a Snail Frog Closure - Threads

Here is a technique that you might want to try. Kenneth King is so creative and his instructions are easy to understand. How to Make a Snail Frog Closure - Threads

Thursday, October 04, 2012

Sewing Savvy

Yesterday, I had a chance to run into town and stop at the library for a bit. As I usually do when there, I check out all the magazines that have been donated and are up for sale. I managed to snag 8 copies of the 2008-2009 issues of Sewing Savvy magazine. I'm sorry to say that this publication has ceased publication at this point. I did a quick flip through and when I have time I will be reading more of the articles in the magazines. They have an impressive amount of projects for embellishing clothing, kids clothes, kitchen and home projects, aprons, and seasonal decorations. Rather than focus on one type of sewing, they would give tips on what to do if you, say for instance, don't have an embroidery machine how to make the featured item anyhow. They also used lots of fancy stitches when appropriate. I especially love books and magazines that can help me imagine the possibilities of all the decorative stitches on my machine. I know I am going to get lots of ideas from these magazines, and the best part? They were only 25 cents apiece which I managed to scrounge the $2 total price out of the coins in the bottom of my purse!

For those that have hobbies and want to thin out their stash of magazines, etc. don't forget your local library or thrift store -- never, ever the garbage. Most are happy to take donations. I know I personally am always ready and willing to take any kind of needlecraft magazines off of any one's hands. Free of course being the best price LOL! I use them as the equivalent of picture books on the days I'm especially not feeling well as it takes my mind off the pain. So many thanks to whoever donated these particular magazines to the McCord Library in North East, PA! I've gotten some great magazines there during this year.

Friday, September 21, 2012

Tulips and Heather

I would love to introduce to you a fairly new blog called Tulips and Heather This is my most amazing daughter-in-law's blog. She is one of the most talented, smart, beautiful young women I know. The moment Ron brought her home to visit us, even though it was  past 11PM at night, it was like the sun came out in the house and it didn't set until she left. Because of the distance they are from us, visits will be very rare and most precious, so I am especially pleased to see bits and pieces of their lives by way of her blog. You might enjoy seeing some of her great ideas as well!

Saturday, September 01, 2012

National Sewing Month


September is National Sewing Month! I'd like to invite you to our store, Moonwishes Sewing and Crafts to shop for your sewing pattern needs. We have been listing like crazy the last couple of months and have close to 7800 different patterns in all styles and sizes listed at this point. We have a great selection of costume patterns for the upcoming Halloween and also patterns for church Christmas pageants and choir robes. Yesterday I was busy restocking our Women's Plus size patterns and if you check in the Unisex Pattern category of our patterns you will find even some larger extended size patterns if needed.

We work hard to maintain a large selection of patterns so our customers have a broad choice all in one spot. I also enjoy comparing patterns from current times to those in the past. Some are uncannily the same and others show styles that come around every couple of decades. I've noticed that peplums are coming back in style and the latest Threads Magazine, issue 163, ran an article on designing and adding a peplum to your garment. Peplums were very popular in the 1980's and we have many patterns that feature peplums that you could use for inspiration and a pattern itself, only watch out for the shoulders on these garments! Nothing better than to mix and match pattern pieces and come up with a great outfit. My favorite summer dress is a combination of a Vogue jumper and Simplicity flutter sleeves.

Shop with us any time!